Saturday, July 17, 2010

Pad Thai

PAD THAI!! This is my favorite recipe to make! It's very easy, and so full of wonder. wonderful. It is my go-to recipe for potlucks and dinner parties alike.Cathy (a wonderful chef and mama) discovered this recipe in the book entitled "The Gluten-Free Vegan." She made it for Erik and I several times, and we ALWAYS went back for seconds. or thirds. It is really THAT good. I couldn't wait to get the recipe.
The tang of the apple cider vinegar combined with the spicy red curry paste and tamari sauce contrasts stupendously with creamy peanut butter and sweet agave nectar. Thin rice noodles and (flavorful!!) cubes of tofu topped with lime and chopped green onion make this meal a real powerhouse of deliciousness and flavor.

Trust me, you should really try this.

Ingredients
1 tablespoon grapeseed oil
2 cups chopped onions
1/2 cup chopped carrots (I always put in more)
12 ounces extra firm silken tofu, cubed
1/4 cup apple cider vinegar
1/4 wheat-free tamari sauce
2 tablespoons agave nectar (I put a touch more)
1-2 teaspoons red curry paste
2 heaping tablespoons of peanut butter
1 cup bean sprouts
6 ounces uncooked rice noodles
4 green onions, chopped
1 tablespoon fresh lime juice

Note: Now I know many of you may not have all of these ingredients hanging out in the cupboards, but once you have these items (tamari, apple cider vinegar, grapeseed oil, agave, and red curry paste) they will last you FOREVER. I've made this recipe at least 4 times since I bought these staples, and I still have well over half of everything left. Splurge a little now, and you'll have these ingredients for a very long time. dilemma: "what if I don't like this recipe, and I spent all this money on these ingredients?" Believe me, if you are someone who is inclined to like thai-themed food, you will love this. If for some reason it's not your favorite, all of these ingredients can be used in different recipes. Take a chance! You won't be disappointed.

How to:
Boil some water for your rice noodles.
In a large skillet, heat the oil over medium-high heat and add the onions and carrots. Sauté until the onions become soft, 4-5 minutes. Add the tofu and continue to cook, stirring occasionally, for 4-5 minutes.
[Now would be a good time to cook the rice noodles.]
Add the vinegar, tamari sauce, agave nectar, red curry paste, and peanut butter.
Add the cooked rice noodles to the peanut buttery mixture and mix in the bean sprouts. Garnish with lime juice and green onion. ENJOY!

Friday, July 16, 2010

Chocolate-Peanut-Butter-Coconut-Banana-CUPCAKES

My version of Ashley's [@ (neverhome)maker's] delicious cupcakes! Here's the original recipe:Big Hunk o' Love Cupcakes!
I changed it a little bit and added a chocolate coconut drizzle and coconut flakes... basically it's just decoration, but I think it's JAZZY!

And this is WOLFY! :D he helped make the frosting and suggested the addition of more peanut butter. (his favorite)
chocolate coconut sauce:
1/2 c chocolate chips
2 tablespoons virgin coconut oil

Melt the chocolate and coconut oil in a bowl set over a pot of simmering water. Stir occasionally to keep the chocolate mixture glossy and prevent it from burning. Once the cupcakes have cooled and you've frosted them, drizzle it over!


Saturday, July 10, 2010

Apricot Mulberry Cream Tart

I wanted to make a tart. So I did.
A light filling of cream cheese and sugar with bluberries and homemade apricot butter (more on that later!) folded in made this tart a unique and delicious experiment! Topped with fresh strawberries and mulberries from my very own mulberry tree made this tart a fresh and fruity treat. Homemade whipped cream and macerated mulberries in sugar was the perfect topping. The crust is so easy - it's just a sheet of puff pastry!
Ingredients:
- 1 sheet of puff pastry (thawed)
Filling:
- 1 package of cream cheese, softened
- 3 tablespoons of sugar
- 2 tsp. vanilla
- 1 egg
- 3 tablespoons flour
- about 1/4 c of apricot butter (maybe a little bit less) (you can also use apricot jam, or whatever your favorite flavor of jam is!)
- 1/4 c fresh or frozen blueberries
Mix the sugar, egg, vanilla and cream cheese together until smooth. Add the flour, and then fold in the apricot butter. Mix in the blueberries. Chill in the refrigerator until you're ready to use it.

Pre-heat the oven to 400 degrees. Gently mold the puff pastry into a buttered nine-inch tart pan. Place in the center rack of the oven and bake for fifteen minutes, until lightly browned. Take the tart from the oven. Don't worry if it puffs up! You can just deflate it with a spoon.

Lower the oven temperature to 350 degrees. After you take the pastry out of the oven, pour the filling into the center of the tart and return it to the oven, and bake until the filling is set, about 20 minutes.

If you have a mulberry tree, like me, then go pick some mulberries! Blackberries or raspberries would make a splendid substitution if you are lacking in the mulberry tree department. Mash the berries together to form a sort of sauce. Add about a tablespoon of sugar to the mixture and chill in the refrigerator. When the tart comes out of the oven, pour some of the berry juice over the top, and watch as it soaks into the tart. Let the tart cool! Later, slice some strawberries on top, and make some whipped cream! Eat! Eat! Eat! and love.


Friday, June 18, 2010

True Blood Cupcakes

My vampire partner in crime (Brandon) and I decided to celebrate the third season premiere of what we consider to be the best show ever, True Blood. The vampires, the maynads, the shape-shifters, the telepaths, and now, the werewolves? We couldn't not celebrate! Our party was red-themed, because, well, vampires = a whole lot of blood! We had strawberries, watermelon, blood orange soda, red vampire pancakes (red food coloring with a dollop of raspberry jam in the middle of each cake = YUM), red eggs (food coloring and copious amounts of ketchup!), garlic bread with tomatoes, AND last but not least, RED CUPCAKES!!! These were dang tasty. While I did use a boxed white cake mix (whatever, they still taste wonderful!), I made homemade cream cheese frosting and it was to die for! (Or, to become a vampire for!) Add almost a whole bottle of red food coloring, and you've got some bona fide TRUE BLOOD CUPCAKES! I think everyone enjoyed them, because they were all gone by the end of the day and some people had two! (including myself).

1 white cake mix - I think I used Betty Crocker?
1/3 cup vegetable oil
3 egg whites (I saved the yolks and made an omelette the next morning... success!)
LOTS OF RED FOOD COLORING! (as much as you want)

Frosting:
1 block of softened cream cheese
1 stick of sweet cream butter
Powdered sugar (as much as you want until you get the desired consistency/amount of sweetness)
red food coloring, lots of it.
Red sprinkles for decorating!

Make the cake mix and add the food coloring! Pour the batter into cupcake tins filled with paper liners. They say to fill the cups 2/3rds full, but I filled them up more because I wanted really big cupcakes.
Put them in the oven at 350 degrees and bake for about 18 minutes!
Let them cool completely before you frost them.

The Frosting
cream the butter and the cream cheese together until light and fluffy. Add the powdered sugar and mix a little more. Add the drops of food coloring and mix with a wooden spoon until you reach the desired consistency. Spread generously on the cooled cupcakes and sprinkle the finished product with red sprinkles! Et VOILA! True Blood Cupcakes whenever you want them!

Sunday, May 23, 2010

(blue) cheesecakes and chocolate covered raspberries


As you may know, I live in a 13 x 11 foot rectangle. While I have fun cooking in my cozy dormitory quarters, there's just something about having an actual, beautiful, bona fide kitchen to bake in that makes the whole experience so rich and enjoyable. Countertops, an oven, a sink, measuring cups and bowls, a stove, and cupboards may seem like simple amenities, but when you live in an expensive rectangle, they become pretty special. Okay, I exaggerate a little, but really, it is a very rare opportunity for me to have a kitchen to cook in when i'm at school, so when I got the chance to make cheesecakes in a REAL KITCHEN at a wonderful gal's apartment (thanks BDAY!!), I jumped at the chance. I had so much fun, and definitely satisfied my kitchen addiction. We also made chocolate covered raspberries, which you can also make in your dorm!
Turbinado sugar-in-the-raw, mixed with FIVE blocks of cream cheese!
blue food coloring made these little cakes special. We had to use A LOT!
EGGS! in a SINK! I love sinks.
little mini graham cracker crusts - we doubled the recipe, so we were able to make 12 cheesecake cupcakes, an entire cheesecake pie, and another rectangular pan of cheesecake bars! I feel like we quadrupled the recipe! So much cheesecake. But so good.


isn't it beautiful? Here, you can find over 100 cheesecake recipes for any occasion!
Perfection!

IKEA dark chocolate bar: $1. Making chocolate covered raspberries with your friends: priceless
Raspberries: on sale for 99 cents!
the assembly line...
all the raspberries have little chocolate button hats on!
these sweet treats are simple and easy to make, and very elegant! Impress your floormates with these gourmet creations. Or make them just for you. You can be classy all by yourself. :)

Chocolate Covered Raspberries:
1 bar of chocolate (milk, dark chocolate, or otherwise)
1 pint of fresh raspberries, washed and drained

Break the chocolate bar in pieces, and microwave it in intervals of fifteen seconds - stir with a spoon after each interval. I probably microwaved mine for a total of 45 seconds. Make sure you stir the chocolate so it stays glossy and beautiful! Ina Garten says that the trick to glossy chocolate is to stir it often!

Once the chocolate is melted, decorate your raspberries! What I found to be easiest was to take a small spoonful of melted chocolate, and drizzle it on top of the raspberry. Gently set your raspberry on a serving dish and let the chocolate harden. (or sneak a taste when the chocolate is still melty.) YUM.

Saturday, May 22, 2010

Novel

Books and Breakfast. If you enjoy these two B-words, you will most certainly enjoy The Novel Café in Westwood. The ambiance is low-key and casual, and the FOOD is fantastic.
Their beautiful belgian waffle has a giant dollop of sweet whipped cream with heaps of strawberries and bananas on top. The waffle is light and airy, with a satisfying crunch on the rim. ( I was going to say edges, but belgian waffles don't have edges).
While browsing through their extensive book collection (non-fiction and fiction alike), you may enjoy a fresh and flavorful omelette. This one had sun-dried tomatoes, basil, and creamy goat cheese. Rye toast and a side of potatoes make this meal complete.
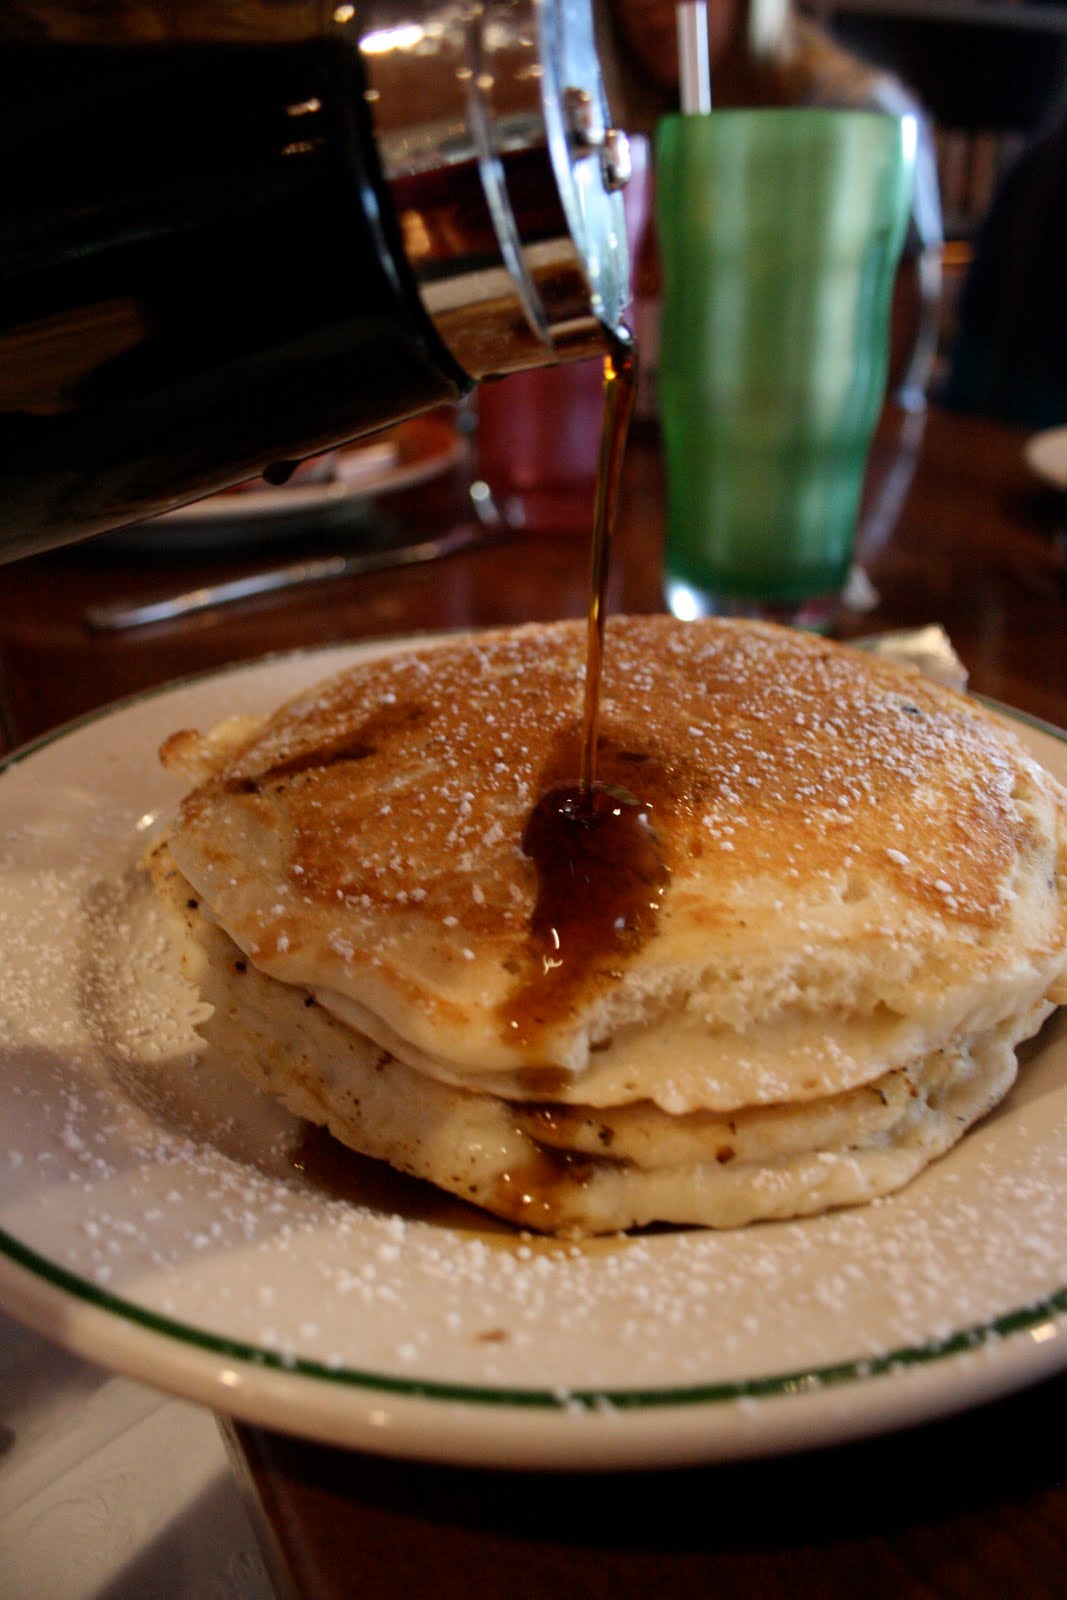
The various colors of cups give the table a funky feel. Enjoy three fluffy and delicious blueberry (or strawberry, banana and walnut, or plain) pancakes with powdered sugar and generous amounts of pure maple syrup. (not that artificial, chock-full-of-chemicals syrup you see for a fraction of the price of the real thing in the grocery stores). I've always wanted to go to Vermont and collect my own maple syrup! How cool would that be?

Novel also offers many lunch options and scads more things for breakfast, ranging from breakfast quesadillas to eggs florentine! They have several other locations in Los Angeles, including Santa Monica. Here's there website: The Novel Café
I love this place!

Friday, May 21, 2010

Banana Trifle!

What do I do with all the bananas from the dining hall? Make banana trifle o' course! (did you hear Hagrid in your head when you read that?)
You will need:
1 blender
1 pint of heavy whipping cream
6 sugar packets (easily gotten from B-Caf or any dining hall in the tea section)
1-2 teaspoons vanilla extract
1 box of instant vanilla pudding (or chocolate, or whatever your favorite flavor is!)
1 portable coffee cup of milk from B-Caf (or 2.5 cups of milk procured from another source)
Lots of vanilla wafers! (about three-fourths of the box)
4-5 bananas, thinly sliced
1/2 of a lemon's juice - to mix with the bananas to keep them from getting brown
lemon curd, blackberry jam, nutella

First, make the pudding! Mix the milk and the pudding mix together in a portable container, like an empty yogurt carton or a tupperware. Vigorously whisk the mixture together until it gets thick. Then pop it in your fridge and let it set up.
Next, make the whipped cream! I found out that you can, in fact, make whipped cream with your blender. I put the blender in the freezer to ensure the best whipped cream possible. The cream whips up better when it's blended in a really cold container. Pour the whole pint of heavy cream into the blender. Flip the switch and watch simple cream turn into a tasty treat! Add the sugar packets and the vanilla extract. Keep churning that blender till you have copious amounts of whipped cream.
Break the vanilla wafers up into little bits. Slice the bananas and put them into a bowl.
Now begins the layering process:
vanilla wafers, bananas, pudding, whipped cream, repeat. End with whipped cream and a decoration of bananas on top. We flavored the whipped cream with several different things: for the first trifle, we folded lemon curd and blackberry jam into the cream. For the second batch, we used nutella! YUM.
Enjoy! Very simple and fun to do in your dorm room.

PB and Strawberry Smoothie

Strawberries! I brought some organic strawberries back to school from home and I thought they would taste delightful in a rich and delicious smoothie. I found my inspiration from Jamba Juice. They have this item called a "chunky strawberry topper": strawberries, bananas, yogurt, soymilk, and granola all mixed together in what they call an "ideal meal". I augmented this a bit and used:
- 3 Organic Strawberries
- 1 banana (frozen)
- 2 tablespoons creamy peanut butter (but I think crunchy would also be a great choice!)

I blended this all together and it made a thick concoction with a lovely ice cream-y consistency. I sprinkled some raspberry granola (from Andy's!) on top and voila! The perfect late afternoon snack...

Sunday, May 16, 2010

(not your average) Brunch in the Dining Hall

This morning, creativity was afoot in the De Neve dining hall. Brunch was the goal, but there were rules. 1: Food must be created by YOU. Simply taking a plate of food already prepared for you was not an option - you had to take the food, and change it and make it your own beautiful food creation! 2: HAVE FUN! 3: Share what you made with your friends. For my culinary experiment, I made cinnamon cream cheese frosting (per the advice of Lauren): a little bit of cream cheese, a little bit of powdered sugar, and several dashes of cinnamon and vanilla spice. Mix it all together, et voila! I spread that on a waffle, and then added some fruit to take it to what Matthew deemed a "Giada gourmet" level. :) I cut up an apple into bite size chunks, added a drizzle of honey, and microwaved the whole thing for about two minutes. The apples were warm and delicious. I topped the waffle with those, and then sprinkled fresh peach slices, blueberries and strawberries on top. PERFECTION.

Lauren made a fresh croissant sandwich... pesto/feta/greens/fried egg/bruschetta + mini croissant = YUM
Bethany made this ridiculously tasty casserole - a mixture of tater tots, red peppers, scrambled eggs, copious amounts of cheddar cheese, and sriracha! Microwaved all together till the cheese melts = wow. Decadent and delicious.


It was a lovely day for creativity and experiments in the dining hall - you should try it sometime!
Oh, and there were human-sized chickens everywhere celebrating the inception of cage free! eggs in all of the dining halls. Progress!

Thursday, May 13, 2010

Damon and Pythias


If you're in the mood for some deliciously orange sweet potato fries, drop by Damon and Pythias at 1061 Broxton Avenue. Discounts for UCLA students! I tried the California Garden sandwich - filled with tons of veggies! Portabello mushrooms, grilled eggplant, grilled peppers, arugula, tomatoes, cucumbers and this really tasty honey mustard sauce. You can make it vegan without the garlic aioli! Enjoy :)

Thursday, May 6, 2010

IKEA and LA

Two weekends ago I found myself on an adventure around LA. What was originally just a pilgrimage to IKEA turned into an entire day of urban explorations.
We went to the Grand Central Market (http://www.grandcentralsquare.com/), where I got two huge cartons of strawberries for ONE DOLLAR, and a delicious homemade cannoli for $1.84. I tried El Salvadorian food for the first time, and I can't wait to try it again. We got three carto
ns of blueberries for ONE DOLLAR, and had a lovely picnic lunch on the bench that Tom and Summer fall in love on in 500 Days of Summer. So much fun!! After that we made our way to Burbank for our IKEA adventures... more 500 Days of Summer...special cloudberry jam, only made at IKEA, Swedish meatballs + mashed potatoes + mushroom gravy + lindenberry sauce = how much? ONE DOLLAR! Later, we got coffee at this special diner in Chinatown and it was 9 CENTS! What a beautiful and unforgettable day of food and friends. And cheap. LOVE!